Graphic Design 2020-2021
Students: Check this out MasterClass
Graphic design is everywhere. It is impossible to go through a day without seeing countless combinations of words and images on DVD covers, in magazines and books, on billboards, online, and even inside your kitchen cabinets! This yearlong course is designed for students who are interested in expressing themselves visually and digitally.
In this class students will learn about graphic design principles, creative and expressive typography, page layout, and digital image manipulation through the completion of both print and multimedia based assignments. Projects may include, but are not limited to the creation of logos, posters, ads, magazine spreads, information graphics, book covers, animations and websites.
Industry standard software Adobe Creative Suite will be used for all class projects and homework.
With that being said, sitting down in front of a computer and throwing a few words and images on the screen does not make you a designer. Good design does not just happen on its own. All projects will be created through a process that involves research, writing, conceptualization, sketching, and finally, skillful execution of your ideas.
A sketchbook is required
If you fail to bring it with you to class, I will consider you unprepared. I will not allow you to your lockers during class to retrieve your sketchbook.
A USB Flash drive is required for class.
You are required to back up your work at the end of every class.
Anything written on the board
Must be copied into your sketch book
Your sketchbook is your place to keep notes, brainstorm concepts, collect visual examples, sketch out ideas and reflect upon your work. The documentation of your creative process is as important as your final projects. While I do not expect high AP quality drawings, I do expect you to put a a good deal of effort into your planning and drawings. Stick figures are not acceptable sketches nor are sketches done after you have created your computer project.
- Your sketch book will be collected and graded at the end of each quarter.
All Final work must be saved as PDF and saved to your folder. Please print your documents and put your name and class number on the back.
What is Graphic Design?
Good design isn't decoration, its a solution to a problem, and good designers recognize that fact. Bad design lives inside Photoshop, good design lives around the edges of a hard problem.
Good design is hard. Its fraught with constraints, conflicting opinions, and the challenges of solving a problem for a broad set of people. Yes, the process requires good taste and skills, but most of all, good design requires the soft skills that bad designers never seem to master (insight, empathy, negotiation, backbone, business savvy).
Bad designers keep throwing solutions against the wall until something sticks (or they get fired). Their solutions are derivative, "inspired" by the latest fad or successful app, rather than being based in well considered solutions
A good designer can defend their choices/decisions with solid rationale based in the customer (or user's) need or business value. Bad designers rely on "I went to design school, and look! That's what Apple does"
In my experience, bad designers don't listen well. They never go beyond a superficial rendering of exactly what they were asked to do. Bad designers don't add value.
Everyone starts as a bad designer. The trick is to becoming a less bad (and eventually a good designer) is to hone your skills and craft, but focus on developing your soft skills.
The true mark of a great designer is a great listener, empathetic, humble, and interested in solving hard problems with other smart people, regardless of their background.
Contrast
Repetition
Alignment
Proximity
What is Graphic Design?
Understanding Typography
GRAPHIC DESIGN WEBSITES:
https://www.youtube.com/watch?v=_2LLXnUdUIc
https://www.youtube.com/watch?v=YqQx75OPRa0
https://www.youtube.com/watch?v=sByzHoiYFX0
https://blog.adobespark.com/2016/07/27/8-basic-design-principles-to-help-you-create-better-graphics/
50 Graphic Design Terms
Getting thrown into the world of graphic design can sometimes feel like learning a new language
Kerning, tracking, warm colors, cool colors, CMYK, RGB, OMG. There are a lot of technical terms thrown around and it can get confusing at the best of times. But, if you’re finding yourself confused, never fear – I'm here to help.
So, whether you’re a new designer yourself, are just a little curious, or are simply trying to decipher your designer’s emails, sit back and relax as we break down some common terms for you.
Please read to learn terms: https://designschool.canva.com/blog/graphic-design-terms/
How to take a screenshot of your work
Press Command + Shift + 4 at the same time and select the area you want
Adobe InDesign Tutorial
Step 5: Define Columns for your Document
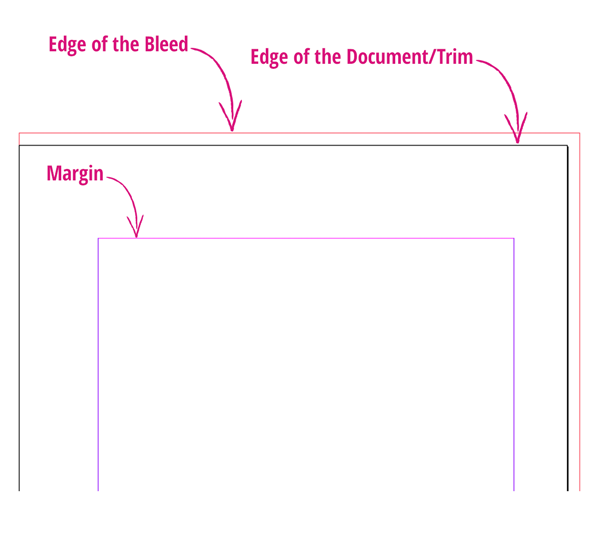
To help develop a uniform Grid throughout your Document, you should set the Number of Columns and the Gutter value (the space between Columns). Setting Columns does not restrict where you can place text or images, but simply provides visual guidelines. Columns are the backbone of a number of print documents, the most obvious being a Newspaper format. Keep in mind that for some documents, such as newspapers, newsletters or magazines, you will need to set 2-3 columns in the New Document Window. This will then be applied uniformly across all the Pages and Masters in your document. For a paperback Book, you may not want to introduce Columns as the area for text is already restricted. So, for now, leave the default Column value at 1. After completing your set-up go to: www.indesignskills.com/skills/create-a-book-in-indesign/ Step 6: Set the Bleed for your Document So, first a common and really important question – WHAT IS A BLEED?? A Bleed is an essential setting for Print documents (you don’t need to set one for Web or Digital Publishing). A Bleed is a small amount of space extending beyond the very edge of the Document. When a Document is printed, it is then Trimmed, or cut along the edge of the Document. There may be a small error in the accuracy of the Trim (printers are human too, after all!). If you have not set a Bleed area, and you have created, for example, a document with color that extends to the edges of the Trim, you may see an unwanted white edge along the perimeter of the card. You can use the Bleed to extend this color across the Trim, so when it’s cut, whatever the margin of error, you will have a seamless all-color edge. If you are producing a document which will have elements (text, images or color) that extend up to the edges of the document, at any point in the document, you should include a Bleed. For a Book, or magazine, you can set a .125" (or ask your Printer for their recommended Bleed Width), on the Top, Bottom and Outside edges. As the Inside Trim edge will not normally be visible, due to being sucked into the binding of the book, you can set the Inside value at .0 inches This also prevents a Bleed appearing in the final PDF on the Inside edge, which could overlap with the page on an opposite spread, creating an ugly look, and a very confused (and angry) Printer! Click the Chain icon to the right of the Bleed options to allow you to set different Bleed values.in your document this is how it will look: For now, remain in the New Document Window. We’re going to take a look at that other confusing term, the Slug… |
In this tutorial, you will learn how to create a New Document in InDesign, and how to save reusable Custom Page Sizes for print and web design.
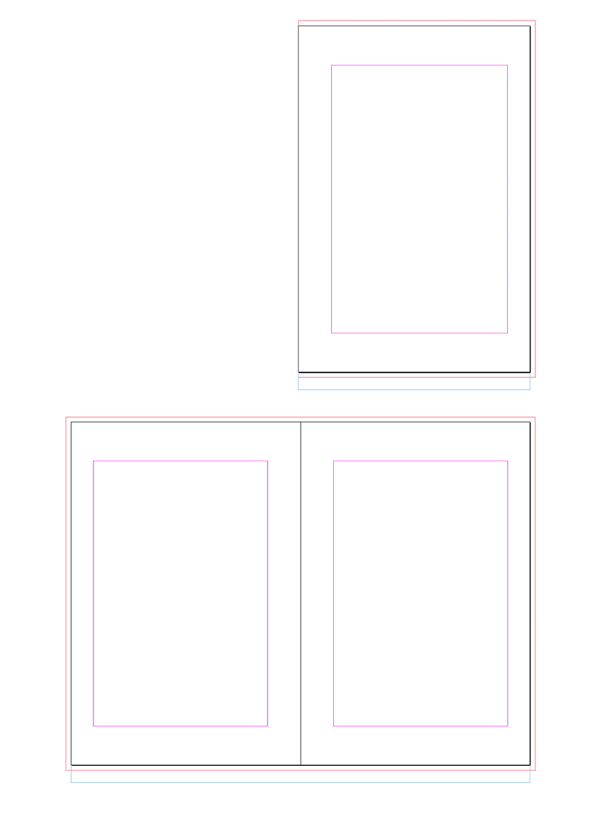
Step 1: Overview of the New Document Window Let’s get started. Open InDesign. From the Welcome Window, select Document from the Create New list. The New Document Window opens on screen. This image shows everything you need to address before clicking that OK button… There’s quite a lot going on here, but it’s really important that you set all your values correctly before creating your Document. It will be much more fiddly to make changes afterwards. Let’s break it down bit by bit… Step 2: Set the Intent of your Document The first thing to tell InDesign is what your final document is intended for, i.e. is it for Print (e.g. a magazine, book, brochure, poster etc), Web (e.g. a website banner) or for Digital Publishing (e.g. a digital eBook designed for tablets or smart devices)? InDesign will be prompted to bring up recommended Page Sizes depending on your choice, and also set the Units and Increments of your document (e.g. Millimeters for Print, or Pixels for Web/Digital). Click once on the default ‘Print‘ value next to Intent to bring up a drop-down menu. Click on the three different Intent options and see how the rest of the New Document Window adapts accordingly. If you keep ‘Print‘ as your Intent, you are offered a number of pre-loaded, standard Page Sizes in the drop-down Page Size Menu, and all Units will be in Millimeters. You can see that InDesign has some preloaded Page Sizes ready to use, such as US Business Card, Letter, as well as European A5, A4, A3 etc. You can choose a preloaded size or create a Custom Page Size. Let’s keep the Intent as Print, and create a Custom Size for a paperback Book as an example… Step 3: Set the Page Size of your Document From the Page Size drop-down menu select Custom… (the last option) to open the Custom Page Size window. You can set the Width and Height of each Page in your document and give the Custom Size a Name by typing in the bar at the top of the window. For example, for a standard European Paperback Book, you would set the values to Width, 132 mm and Height, 197 mm. Name your Custom Size, ‘Paperback Book‘ and Click OK. You may find back in the New Document window that InDesign has switched the Orientation of your document from Portrait to Landscape. Ensure the correct Orientation is selected by clicking the left-hand Portrait icon. Next, you want to make sure the Facing Pages check-box is selected. If you’re creating a book, magazine or booklet, you will want to be able to view spreads (of two facing pages) while you design. When you check Facing Pages, your Document will always start on a Right-Hand single page. If you’re creating a single-page document (e.g. a Letter or Resume), or a document which will be printed on one single ream of paper stock (e.g. a Business Card, a Folding Brochure [with no spine, unlike a Booklet], or a Book Cover), you should uncheck the Facing Pages box. For this Book example, keep Facing Pages checked. Step 4: Define Margins for your Document Setting accurate Margins is a very important task before creating your Document. Adequate Margins will give your final document a professional look, and also, in the case of books in particular, ensure that text or images don’t disappear into the binding at the spine. These are recommended Margin measurements for a Paperback Book. NOTICE that the Inside Value (i.e. the edge of the Page that sits against the spine of the Book) is Wider than the Outside Value. This allows extra white space where the page will be sucked into the binding or the folds of the book. If you’re producing a Booklet (which also has a spine, but may be bound using a Lay-Flat binding technique) you should do the same, but the Inside Margin doesn’t need to be as wide, just add 2-3 extra millimeters. Set the Margin values to: Top:6 picas Bottom: 7 picas Inside: 6 picas Outside: 6 picas |
|

|
Adobe Illustrator Tutorial

|
|
|
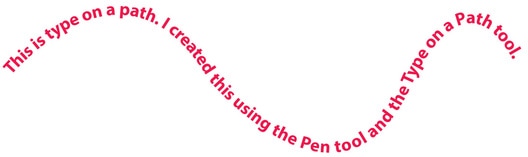
See : Drawing Basics 1. Create a new document in Adobe Illustrator, Name is Your Name_Illustrator Practice 2 2. Size is 8.5" x 11" 3. Add Bleeds 1/8" or 9 pts. or .125" (all are the same) 4. Find a simple photo image to trace and place on a layers About layers In graphics software, a layer is the term used to describe the different levels at which you can place an object or image file. In the program you can stack, merge or define layers when creating a digital image. Layers can be partially obscured allowing portions of images within a layer to be hidden or shown in a translucent manner within another image, or you can use layers to combine two or more images into a single digital image. For the purpose of editing, working with layers allows you to go back and make changes within a layer as you work. 5. Find a simple image and place the image on a layer in Illustrator (name the layer "Photo") 6. Lock the layer 7.Using the pen tool with a 2 point black stroke, Trace your image 8.Select the Type on a Path Tool and click on the path 9. Start typing until your path is completely covered in Type 10. hide your original image. and show only the type About vector graphics Vector graphics (sometimes called vector shapes or vector objects) are made up of lines and curves defined by mathematical objects called vectors, which describe an image according to its geometric characteristics. You can freely move or modify vector graphics without losing detail or clarity, because they are resolution-independent—they maintain crisp edges when resized, printed to a PostScript printer, saved in a PDF file, or imported into a vector-based graphics application. As a result, vector graphics are the best choice for artwork, such as logos, that will be used at various sizes and in various output media. The vector objects you create using the drawing and shape tools in Adobe Creative Suite are examples of vector graphics. You can use the Copy and Paste commands to duplicate vector graphics betweenCreative Suite components. About paths As you draw, you create a line called a path. A path is made up of one or more straight or curved segments. The beginning and end of each segment are marked by anchor points, which work like pins holding a wire in place. A path can be closed (for example, a circle), or open, with distinct endpoints (for example, a wavy line). You change the shape of a path by dragging its anchor points, the direction points at the end of direction lines that appear at anchor points, or the path segment itself. Components of a path A. Selected (solid) endpoint B. Selected anchor point C. Unselected anchor point D. Curved path segment E. Direction line F.Direction point Paths can have two kinds of anchor points: corner points and smooth points. At a corner point, a path abruptly changes direction. At a smooth point, path segments are connected as a continuous curve. You can draw a path using any combination of corner and smooth points. If you draw the wrong kind of point, you can always change i A path’s outline is called a stroke. A color or gradient applied to an open or closed path’s interior area is called a fill. A stroke can have weight (thickness), color, and a dash pattern (Illustrator and InDesign) or a stylized line pattern (InDesign). After you create a path or shape, you can change the characteristics of its stroke and fill. In InDesign, each path also displays a center point, which marks the center of the shape but is not part of the actual path. You can use this point to drag the path, to align the path with other elements, or to select all anchor points on the path. The center point is always visible; it can’t be hidden or deleted. In Illustrator, you can show or hide anchor points, direction lines, and direction points by choosing View > Show Edges or View > Hide Edges. |
1. Create a document, (FILE>NEW) 8 1/2" x 11"
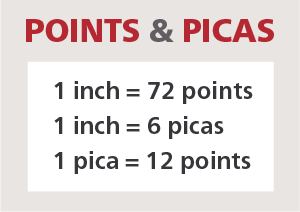
Points and Picas A pica is a hair less than 1/6 inch, and contains 12 points. Picas are typically used to represent fixed horizontal measurements, most often column width. They are commonly used when designing newspapers, magazines, newsletters, and ads. 2 . Add a Bleed. standard bleed is 1/8" or p9, or .125" What is Bleed? Bleeds allow you to run artwork to the edge of a page. On a press, the artwork is printed on a large sheet of paper and then trimmed down to size. If you do not allow for a 1/8 of an inch bleed, any misalignment while cutting will result with the artwork not running to the edge of the paper. Bleeds ensure you get the results you need (see an example). For example, if you have designed a standard 3.5" x 2" business card with a red background covering the whole area, you will need to enlarge that red background to 3.75" x 2.25". This will make the red background extend 1/8" on every side of the page. Why is adding a Bleed necessary? Small mechanical variations can end up leaving a hairline white edge where there should be no white edge at all, if the image is not extended beyond the final trim size. Extending images 1/8" beyond the final trim size guarantees that images truly will go all the way to the edge of the printed paper. 3. Show Rulers 4. Set document , to center vertically and horizontally. 4 1/4" and 5 1/2" Guides are dragged off of the visible rulers Using the Pen tools and shape tools and curvature tools you will learn to create a square, a triangle, a circle and polygon. You will also lean how to create a path and ad type to the path |
GENERAL BREAKDOWN OF UNITS
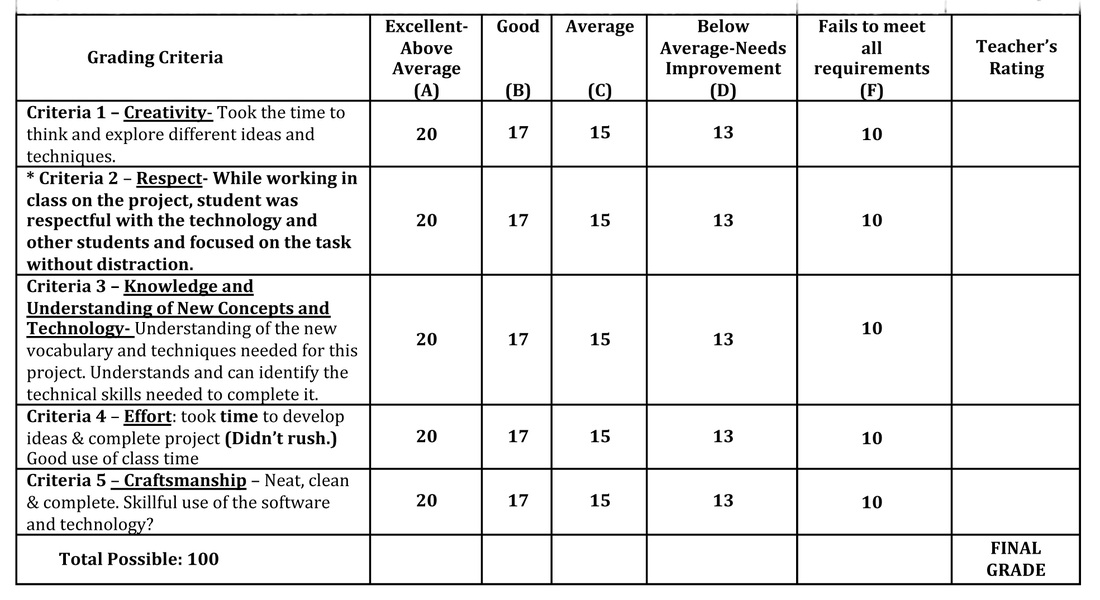
RUBRIC
Homework
If homework is not completed for the start of the class, you will be given the opportunity to complete it THAT day. You will need to turn it in to me before school begins the very next day. To turn something in ‘the next day’, means next school day, not next class period.
Assignments
The majority of work is done in class; therefore, there is no excuse for missing assignments. Due dates and deadlines are given far enough in advance, and are extremely fair. All re-worked/re-submitted pieces are due 2 weeks before the end of each semester, at the latest. You will need to complete a re-submittal plan, and get it approved by me before the original project is graded.
You have 1 week to make up any work from an excused absence. This includes projects, assignments, etc. It is the student’s responsibility to check for missed assignments in a timely manner and to turn in missing work. In emergencies and serious illnesses, obviously other accommodations between the student and teacher will be arranged.
If you do not complete or turn in a major project, the following steps will follow:
ACADEMIC DISHONESTY
This class should stretch your artistic abilities and your imagination. These courses expects that you create original and personal work which is not copied from other sources. You are expected to practice artistic integrity at all times!
“Any work that makes use of other artists’ work (including photographs) and/or published images must show substantial and significant development beyond duplication. This may be demonstrated through manipulation of the formal qualities, design, and/or concept of the original work. It is unethical, constitutes plagiarism, and often violates copyright law simply to copy an image (even in another medium) that was made by someone else.”
Artistic Integrity also includes taking responsibility and not allowing someone else to physically do your work for you. Turning in someone else’s work with your name on it is cheating. The school cheating policy will be strictly enforced, and you will need to create an entirely new project within a designated amount of time.
Not quite sure what academic dishonesty or plagiarism in art looks like? Read this article for more information. In addition to the categories listed in the article, having your friend, parent or family member work on your piece of art counts as well.
Learner Profile
Active Learner: Active learning is contributing to class discussions, group brainstorming sessions and critiques. Time and effort goes into the planning and design of projects, as well as pushing the boundaries and going beyond the minimum requirements.
Integrity: A student demonstrating integrity is focused and on task at all times- no Photobooth, Messenger, games, texting, etc.
Responsibility: Responsibility includes meeting deadlines, and being prepared for class,
If homework is not completed for the start of the class, you will be given the opportunity to complete it THAT day. You will need to turn it in to me before school begins the very next day. To turn something in ‘the next day’, means next school day, not next class period.
Assignments
The majority of work is done in class; therefore, there is no excuse for missing assignments. Due dates and deadlines are given far enough in advance, and are extremely fair. All re-worked/re-submitted pieces are due 2 weeks before the end of each semester, at the latest. You will need to complete a re-submittal plan, and get it approved by me before the original project is graded.
You have 1 week to make up any work from an excused absence. This includes projects, assignments, etc. It is the student’s responsibility to check for missed assignments in a timely manner and to turn in missing work. In emergencies and serious illnesses, obviously other accommodations between the student and teacher will be arranged.
If you do not complete or turn in a major project, the following steps will follow:
- Missing/Incomplete entered into Gradebook
- Parents and counselors are contacted immediately when large projects are not turned in.
ACADEMIC DISHONESTY
This class should stretch your artistic abilities and your imagination. These courses expects that you create original and personal work which is not copied from other sources. You are expected to practice artistic integrity at all times!
“Any work that makes use of other artists’ work (including photographs) and/or published images must show substantial and significant development beyond duplication. This may be demonstrated through manipulation of the formal qualities, design, and/or concept of the original work. It is unethical, constitutes plagiarism, and often violates copyright law simply to copy an image (even in another medium) that was made by someone else.”
Artistic Integrity also includes taking responsibility and not allowing someone else to physically do your work for you. Turning in someone else’s work with your name on it is cheating. The school cheating policy will be strictly enforced, and you will need to create an entirely new project within a designated amount of time.
Not quite sure what academic dishonesty or plagiarism in art looks like? Read this article for more information. In addition to the categories listed in the article, having your friend, parent or family member work on your piece of art counts as well.
Learner Profile
Active Learner: Active learning is contributing to class discussions, group brainstorming sessions and critiques. Time and effort goes into the planning and design of projects, as well as pushing the boundaries and going beyond the minimum requirements.
Integrity: A student demonstrating integrity is focused and on task at all times- no Photobooth, Messenger, games, texting, etc.
Responsibility: Responsibility includes meeting deadlines, and being prepared for class,